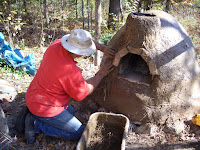
Either your basic clay-sand mud, or clay-sand with sawdust for the insulation layer.I did not have sawdust to add so used wood shaving that are sold for animal bedding. The entire oven is made of three layers. An outer layer of clay-sand mud, a middle layer of mud-sawdust mix to insulate the inner layer of clay-sand mud. Since I had them ,I put in a layer fire brick for the oven floor. The inner layer absorbs the heat of the fire to provide the heat you cook with. The middle layer helps the oven retain that heat, the outer layer is the protective "skin".
To form the actual oven cavity I built a loss basket of willow twigs and covered that with flour paste soaked newspaper. After setting that in place I started building up the three layer walls.As you can see the oven cavity is big on mine. Too big to be efficient really. On the up side, we can bake five loaves of bread at a time and once it is hot it will retain heat until the next day. If I built another it would be smaller though. This size uses a quite a bit of wood to get hot. One important note here, The wood must be DRY. Dry as in absolutely totally dry because the last thing you put in the oven after you are done cooking is the wood for your next fire. And, split it small, you want a very hot fire.
Here I am, almost to the top of the dome. I have started the door area. Check how big you need the door for any pan you might want to use. The thickness of the inner layer is going to determine how much thermal mass you have to heat and to store heat. On this oven I went about six inches. Keep the thickness of the layers uniform. Gauge the thickness with a marked piece of wood or a stick as you go.Your oven will need a tight fitting wood door. Build it first and then form the opening around it. The door is soaked in water for several hours each time you use it.
You do not have to have a chimney as this oven does. Since the climate here dictates that my mud oven be protected from the elements I added a chimney to vent the smoke out of the little shed I built around it. My oven is a plain jane . You can get very artistic if you want to. In the book, "Build Your Own Earth Oven", by Kiko Denzer, you will find all the details on building one of these.
After your oven is built it needs to dry out before you can get baking heat. Several small firings were needed before ours would get hot enough. There is a bit of a learning curve before you are proficient at gauging how much heat you have to work with.
Building my basket.
 |
| READY TO BAKE! |


No comments:
Post a Comment