Monday, May 20, 2013

Catch'in Up

Things are getting back to normal around here so I should have time to write a bit again. We have finally gotten into a more normal weather pattern and haven't had any snow or freezing temperatures for several weeks now. I managed to keep all my transplants in the greenhouse going and have started setting out all the cabbage, broccoli, kohlrabi,and brussels sprouts. All of those can take cooler temperatures as can the onions which we are started on .Potatoes and peas will be on the schedule after that and then the warm weather crops like tomatoes, corn, and peppers. We took a few days over the last few weeks for some foraging. Ramps are up in all of our usual picking spots but we haven't picked any yet. Ostrich fern fiddle heads should be up this week if temperatures stay warm. Not much for mushrooms yet although morels are about due to appear. We have been busy with a bunch of new projects but I'll save those for later this week. If anyone in the northcentral Wisconsin area has a hankering for ramps we will be picking next week. Price will be $1.00 per ounce, fresh. Email us here or message us on facebook.

Wednesday, May 1, 2013

Done Sugar'in

We ended our maple syrup season with our best year ever, making a total of 35 1/2 gallons of syrup. After last years 7 quart season it was a welcome change. Considering that maple syrup makes up a big part of our sugar supply it was nice to see a reserve building up in our pantry for times like last year. We like to be as self sufficient as possible and having our own sugar is one more step in that direction. We have made actual maple sugar some years but just kept it all as syrup this year. I did slip a few gallons of partially finished sap into a
fermentor to try a maple mead recipe I found. Of course as with most things that are cooked, the work starts when the cooking is done. All of the buckets, bags, and barrels have to be scrubbed out before they are stored away until next year. Maple sap contains 2-5 percent sugar which means everything it was in is slightly sticky. If not washed up properly it will all grow a lovely coat of mold. I got that job done yesterday and every thing neatly packed away. I want to make those little sheet metal roofs for all the buckets before next season. Keeping extra water from snow or rain out of the buckets will mean less time cooking to get rid of it. I have about 125 buckets left which I am replacing with the bags as the buckets get damaged or break. The only problem I have with the bags is the fact that they only last a couple years so there is that added expense. With syrup season over I can now concentrate on catching up on a few other projects. I have gotten all my seeds in the greenhouse going but now they are forecasting freezing temps at night again! I really do wish the weather would cooperate a bit.
Took a little time off from our chores to take Lily for a walk. Here she is with Ann . We took her to a park where she had a chance to interact with a few strangers and  another dog. She really is quick to adjust to everything we have throw at her so far.  Here is one more pic of the high water at Big Falls, Jump River.


Thursday, April 25, 2013

Modern Inconveniences

It is surprising how many everyday tasks we now use electricity to do. A good example that I never gave a thought to before we went off grid was making a slice of toast. Living with the amount of electricity that a couple of car batteries holds makes electric toasters out of the question. During cold weather the wood fire in our cook stove does the job in about the same amount of time an electric toaster would. The big difference is that when you put your bread on the stove, it is not advisable to walk away unless you like your toast very dark!
 Making coffee is another example. An old fashion percolator does that job easily, on the cook stove in winter and often over a campfire in summer. We also have a bottle gas cook stove which is fine for the percolator but does not work that well for making toast. It is easy to understand why our ancestors abandoned many of the traditional methods of doing some of these sorts of tasks when electricity became commonly available. Convenience. It is so much easier to push down the lever on the toaster and go about your business compared to standing next to a hot cook stove and watching that your toast doesn't go up in smoke.If I put on a pot of coffee and run out side on some errand and forget about it, I end up drinking very strong coffee. Using electricity is really about saving time. All of the automated appliances save time for you to do other things. Not using all that electricity makes you stay with the task at hand. Most times, getting that slightly smokey slice of toast fresh off the fire and spreading some home made butter or jam on it is well worth the time spent standing still and watching for a bit.

Sunday, April 21, 2013

Lily, Our German Shepard Dog

Meet the latest addition to our family. This is Lily, a registered German Shepard Dog, who is nine weeks old. We got her from a friend of ours, Lisa Slattery, owner of Dirt Road Kennel. She is a sharp little pup, already comes to her name and sits for her treats. The house cats are not as impressed as I am!
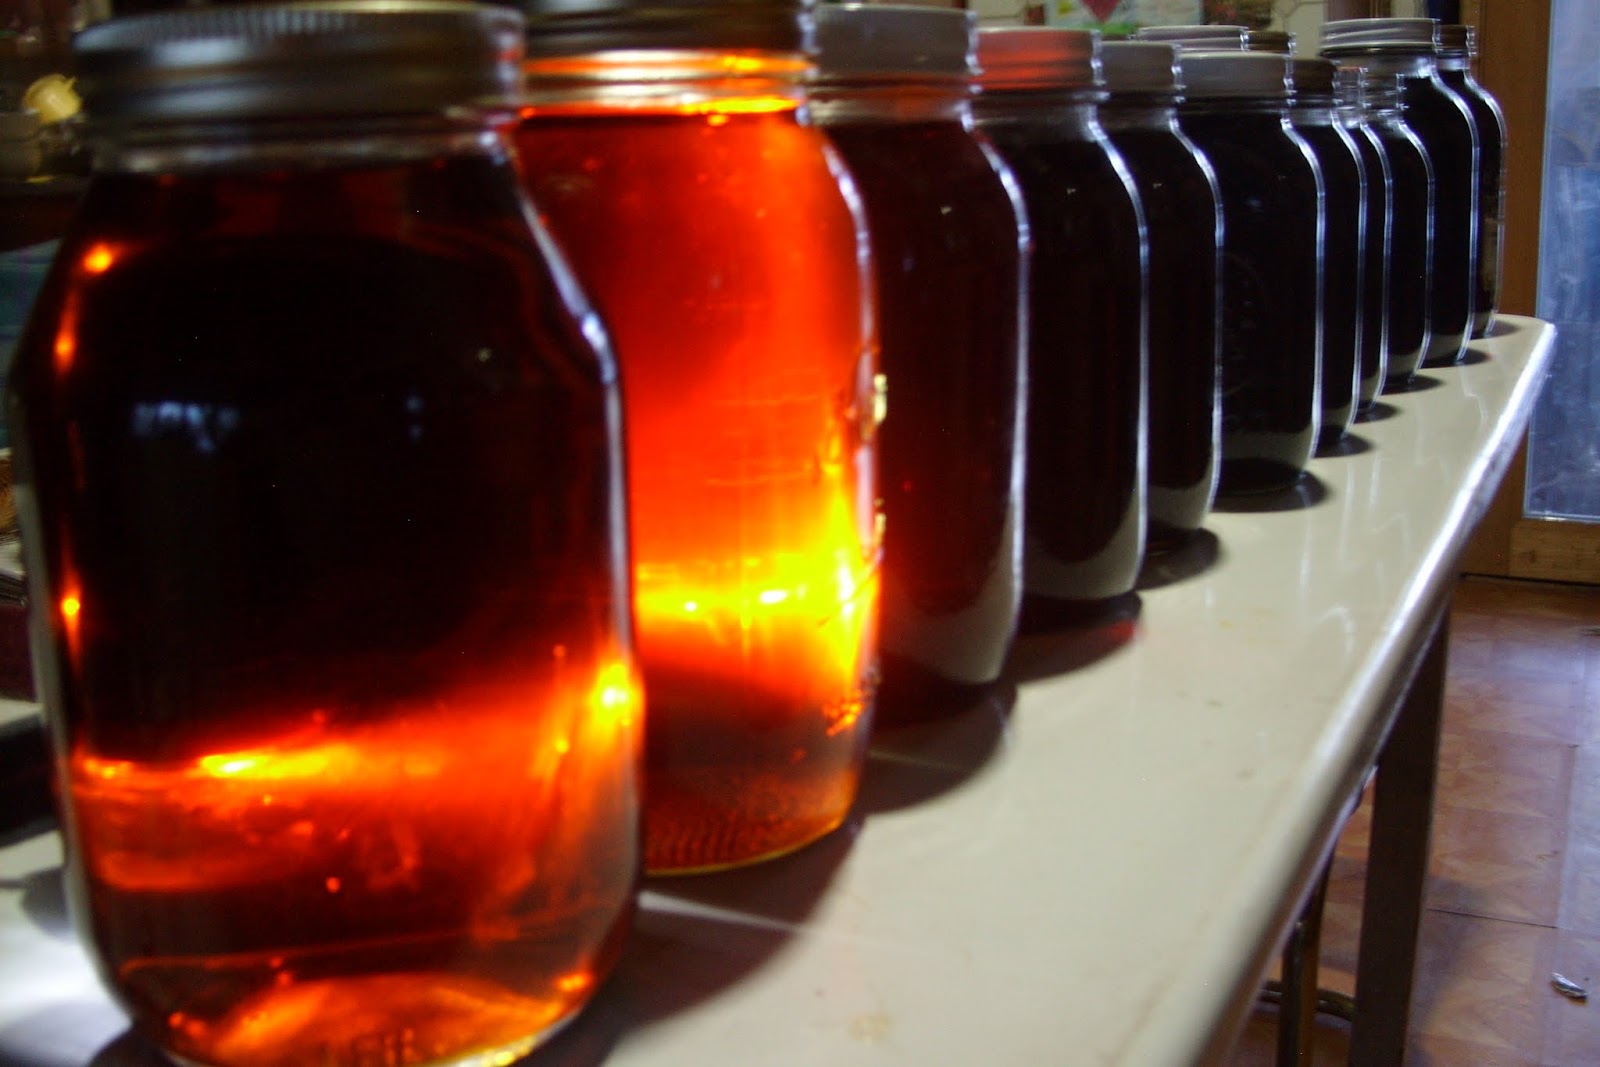
  On the maple syrup front, it is full speed ahead. It is rapidly approaching our best year ever. Even though the sugar content seems a little low the trees are producing sap at a tremendous rate. If by some chance the weather forecasters are right we should have at least another week of good syrup making weather. I have several hundred gallons of sap waiting right now and haven't collected yet today. Fire wood has become my big problem. I did not have nearly enough cooker wood lined up for this years run so I am making it on the go. The reason we are having such a good year is the weather of course. While I love it from a sugar making direction , UGGGG! I am sick of snow! Here is the view when I went out yesterday.
 It was only a few inches but that was a few inches on top of the foot to a foot and a half that is still there. It has rained several times too and with that and the snow that has melted, when you step through the snow it is as likely as not that there is six inches of water under it. I've pulled over a hundred taps because the water is too deep to move around in easily. These were all taps that are a long ways from the cabin and it was too hard to get them emptied every day. I still have close to two hundred in so I won't run out of work .
 Don't even ask about the green house. The cabin is over flowing with seed trays. I will have to keep them in here at least until they germinate. By then maybe I'll be done with cutting wood for the maple syrup cooker and I can start cutting for the green house heater.

Monday, April 8, 2013

Busy,Busy,Busy

Maple syrup season has finally gotten to our neck of the woods. It is later than it has been for quite a few years but it is shaping up to be a good year for production if the weather continues the way it has been. Of course, weather it the determining factor in sap production, it needs to be warm during the day and freeze at night for the sap to run. We have had those conditions here and the trees are giving us a nice run. Yesterday the average per tap run was a little over a quart of sap per tap. With almost 300 taps in that meant about 80 gallons of sap which should give us over two gallons of syrup once it is cooked down. My biggest challenge now will be cutting fire wood for the cooker fast enough to keep that sap boiling. We still have over two feet of snow in the woods in many places so working in that wet snow makes slow going.
Our other project is getting the green house set up and this years seeds started. I'll need about twenty flats again this year. The weather is not good for this project since those freezing nights mean I need to heat the green house. Guess I'd better get back to work, I need more fire wood!

Monday, March 25, 2013

Hauling Maple Sap

With warmer temperatures in the forecast, the maple trees should soon start filling buckets with their sap. I am certainly hopeful  that happens so I thought I should prepare a bit for those gallons and gallons of sap. Many of the trees we tap are not close to any trail we can use to haul the sap on with mechanical means. Once some of the snow melts we might be able to use Ann's pony to haul some of it but there will still be areas where it has to be carried by hand. Five gallons of sap weights about 40 pounds. After a few dozen trips your arms begin to complain. All this lead to my recent project as pictured here, a carrying yoke. I tried it out here with six gallon buckets full of water so I had roughly 100 pounds on. I need to shorten the ropes so that I can grasp the bucket handle and thus divide the load between my shoulders and my arms.
I started out by splitting a aspen log in half with the chain saw. As you will see in the following pictures, I did almost all the cutting and carving with a chainsaw. Chisels, rasps, and knives were used to smooth every thing out. I did not want to spend a lot of time on this so some of the work was left a bit crude.If this turns out to be something I use a lot I will finish it off a little nicer! Some of the felt I made last week found a home as padding  on this.
I determined the overall length by holding a bucket in each hand and then measuring the distance between their centers. To that I add a couple inches for insurance, I can always make it smaller, adding  back on is tricky. At the center line I cut out a semi-circle big enough to fit  comfortably around my neck. You have to start with a log large enough to leave a decent bit of wood behind the neck hole, this one was about 8 inches in diameter.
I next carved and whittled off every bit of extra wood that I could. Less wood, less weight. The carrying shafts on each end need to be at the center of the shoulder so that the load will pull straight down rather than twisting the yoke. I tried to shape the inside surface to fit uniformly across my shoulders so that the load will be spread evenly. After I had it fitting as well as I could I added a thick layer of felt as padding. I used material from a old tee shirt to cover and hold the felt in place.
The fabric is stretchy so that made it fairly easy to get all the wrinkles out. I used staples to attach it. If we have a good year I could easily have 700-800 gallons of sap to get in. A lot of that will need to be carried by hand so this should make that task a little easier. Since some of those trees are over 300 yards from the sap cooker every little bit helps.


Sunday, March 17, 2013

Home Made Felt

These are my three recent tries at felt making. Overall I am happy with them  and I learned a lot about the process of making felt. The actual method of making felt is simple enough, get the wool wet and agitate. That does not indicate the amount of physical effort that must be applied however.On my first attempt I just tossed some globs of wool and llama fiber in the bottom of a plastic tub with hot soapy water and started smooshing them around. I did eventually felt them together.
As to making something useful, no, I did not. To make a piece of nice more or less flat ,smooth felt, a different method is needed. After doing fifteen minutes of extensive research (goggle!), I went back for another try. First off, separate out the fiber and lay them out in a thin layer the size you want. Now, make another thin layer, laid across the direction of the first layer. I built up six or seven layers until I had a pile about six inches thick as it lay.
You can get a rough estimate of how thick your finished piece will be by pressing down on the pile with your hand. This pile ended up making a piece of felt about 3/8 of an inch thick. I don't know if more work would have produced a thinner, and thus denser, finished piece or if that is a function of what type of fiber is used. My thinner pile of three layers made a piece about 1/8 of a inch thick. The three I have made thus far are all alternate layers of wool and then llama fiber.
After the fiber pile is as thick as it is wanted, wet it with very hot, soapy, water, but not too much. You want the fiber uniformly wet but with little excess water. Take my word for it, too much water will prevent the wool from forming a nice uniform layer. As you can see, this will shrink you pile down to a thin layer. I flattened it by patting it and pressing it down with my hands and continued until it starts to form a cohesive layer. It is still fuzzy and stuck to my rough hands when I pressed it.
At that point it is still a long ways from felt but it stuck together enough to slide it onto a sheet of plastic. Then I rolled it up like a jelly roll and slid heavy rubber bands around it every couple inches. I saw several sites on the web that used bubble wrap for this but I didn't have any so couldn't  try that. After my first try I placed the pile of fiber on the plastic to start with. I am not sure if you would really need the rubber bands but it made it easy to keep it all rolled up.
Now the work part started. While putting enough downward pressure to flatten the roll a bit, I rolled it back and forth. I moved my hands from end to end as I went so that all parts were getting the same treatment. It is easy but gets tiring after a while. I switched and used my foot to roll it back and forth for a while. After about 15 minutes of rolling I stopped and took a peek. Not bad, but I thought I could do a little better. I gave it about 5 more minutes of rolling.
Here it is. The pile of fiber covered the tray so you can see how much shrinkage there was. The tray is 17 x 25 inches and the usable area of the felt is about 13 x 17 inches.Some areas along the edges did not get tightly felted so I will trim those off. I already have a have dozen projects in mind that will use some of the felt and I have a huge pile of fiber to work with. Ann has put in her order and is planning to make some house slippers with some. I have several ideas on improving my production methods. If anyone out there has experience making felt I'd love to hear from you.

Monday, March 11, 2013

Spring Projects


Maple syrup season is slowly getting started here on the homestead.We tapped about 75 trees Friday. Saturday it rained and last night and today we received about 8 inches of snow. Of course we started tapping close to the cabin and we use our buckets close so we don't have as far to move them. The down side of that is that they are now all full of snow and rain so we will have to dump them all tomorrow if it is done snowing. Then I will go and repack the trails I have stumped down over the last week with my snow shoes. Hopefully we will get the warmer weather they were predicting. I have at least 40 more buckets to use and 100 sap bags. A lot of the trees I will be using the sap bags on are larger trees and they will get two taps each. Then I use a plastic line tap and a section of tubing to run both taps into one bag.  A few of the trees I tapped Friday ran a bit so it looks like things should take off if it warms up a little.
Our garden seed orders have arrived so I will have to get busy in the green house soon also. This year we ordered all of our seeds from Johnny's Select Seeds and from The Seed Savers Exchange .Everything arrived as ordered so we are all set. We are trying quite a few new species this year such as a artichoke which can be grown as a annual and bulb fennel. I like to have different things at market along with the foraged wild foods that we offer.

Sunday, March 3, 2013

Washing Wool

This picture is of a portion of the flock of up to 80 Shetland Sheep we formerly kept. Then, for various reasons, we sold off most of our flock, but not before we had a huge pile of wool in our hay loft. Commercial wool buyers want white wool, not colored fleeces. Most shepherds of small flocks like ours don't receive enough from the sale of the wool to cover the cost of having the sheep sheared. A big part of the cost of wool yarn is due to the processing it takes to get it to that point, processing wool is a time consuming project.
Our answer to this situation is, do it ourselves. Ann sheared them herself.  Since we wouldn't sell the raw fleeces to most commercial buyers for what they offered we had few other options. Number one, take it all to a custom woolen mill and have it processed. Or, number two, do it ourselves. While Ann sometimes hinted that it would be nice to just get it all processed I am to much of a tightwad to go that route. After crunching all the numbers it was plain to me that the only one making any money on our wool would have been the woolen mill.
We still have a big pile of wool in our hay loft and recently I had another one of my brilliant ideas. I have wanted to make a insulated blanket that will roll down over the front of my green house on cold   nights to help hold the heat in. What could be better than a wool quilt?! Off I went to the hayloft to get some wool and start my project. My first step when I got it back to the cabin was to pull out the nicer sections of the fleece and soak them in some nice warm soapy water. After letting it soak for a couple hours I drained it and did it again.
Care must be taken when washing wool so as not to make it into a big lump of felt. Agitating the wool while it is wet is a big no-no as is rapid changes to water temperature. If you don't do those two things every thing will be alright. I used cheap dish washing detergent to do this.Here in the bottom picture is my first batch of wool spread on some screens to dry. It was about then that Ann came in and looked over the wool. " This is nice looking wool",she said. "Look at the crimp in it". " This would spin nice", she said. Do you see where this is going?  So anyway, I'm going to take some of the yucky stuff and the parts with lots of chafe in them and make greenhouse quilts with that.

Saturday, February 23, 2013

DIY Leather Dressing

My leather work boots are almost three years old and are still in good condition and water resistant thanks to the leather dressing I put on every month or so. Winter weather sees me using a lot of this so I am making some today. I have tried several commercial products and find this homemade version at least as good and a lot less expensive. At least part of the reason this stuff is effective is because it is inexpensive so I slather it on thick and often. I make up a large batch once a year. I make two versions, one with and one without the neatsfoot oil. The version without neatsfoot oil gets a lot of use too. I rub it onto wooden spoons, and other unfinished wood items to help protect them.  I also use it to coat steel items that are prone to rust when not in use. I rub down the column and table on the drill press and the table saw table. A very thin coat is all that is required to keep them rust free. This is basically bees wax with enough mineral oil added to make an easy to apply paste. The exact ratio is not exact!. About half and half, if that is too stiff add more oil, if it's to thin add more wax! I put the mineral oil in a pan, let it heat up, and then stir in bees wax. You should use a double boiler for safety. For the boot dressing,  I do the same thing except after I have removed the mix from the heat and it has cooled enough to start thickening I add in a generous dollop of the neatsfoot oil. Again, no exact recipe here, I just dump in a half cup or so in a batch that is about two cups. My work shoes used to fall apart due to rotten thread at the top of the sole. This stuff soaks into the threads and water proofs them as well as sealing the leather to make it shed water. They are still leather though so if you use them for waders you are gonna get wet feet!

Wednesday, February 20, 2013

Sad Day at Forest House Farm

 Yesterday was a sad day on our homestead. Despite spending the last several weeks trying, we were not able to find enough hay, at a price we could afford, to keep our milk cow. We have already spent more than three times our normal hay budget and still needed more to get us through the winter. It was a tough call but we had to put our cow on the cattle buyers truck. We sometimes raise calves up to butcher or to sell for butcher but the family milk cow falls in a different category. If we were still milking a herd it would be different too. When you have a milking herd there have to be some decisions made based strictly on profit motives or you will not be farming for long. When we got Sissy, our cow, we expected to keep her for a long time so we treated her more as a pet than we would have otherwise. Any animal we have is treated with respect and cared for gently but those we are going to part with are kept out of our heart. We hadn't planned on parting with this one.
 On top of all that there is also a feeling that we somehow failed, that we didn't plan well. We have been buying hay for winter feed for years and never had to sell of livestock before to keep going. This year the prices are two to four times higher than what we paid last year, I certainly didn't plan for that. Then ,the big jump in fuel prices over the last week, made hauling hay in from areas with no shortages, just as expensive. All of this has left a bitter taste in our mouths  and a lot of doubt about the direction we should go with our homestead.

Thursday, February 14, 2013

Pruning Apple Trees

Apple trees, as with many fruit trees, should be pruned while they are dormant. I do mine about now because soon the maple sap will start running and from there on it seems we just get busier and busier. My pictures didn't turn out very good so these will have to do. In this picture I am indicating a sucker or shoot coming up from the base of the tree. Always remove all of these. The basic principle  to keep in mind when pruning your apple trees is to open up the center of the tree. Those branches that go towards the center of the tree should be removed.
Branches that form a very sharp "v" should also be removed since they will be weaker than a more square joint and more likely to split under the weight of a good crop of apples. Cut the limb off with a very sharp pair of shears. Make your cut just past a bud that will grow in the direction you want, away from the center of the tree. All of the decisions are made in light of the fact that many apple trees are what is known as " spur bearing'. This means the apples are on spurs  rather than on the actual branch.
If you prune off a lot of spurs you will reduce the yield considerably. I try to limit the height of my trees somewhat by pruning off the leaders and forcing the tree to grow horizontally  instead.Other spots to consider are branches that are to low, branches that are rubbing another branch, and branches that are very close to another branch. Often you have to decide which is the main objective since doing everything would leave you with a  lone stalk! Yearly pruning gives you a chance to correct faults before they are a big deal.
This last picture is of all the scion wood I saved to graft onto root stock later this spring. As long as the tree you are pruning from is not patented stock it is perfectly fine to save these and do your own propagation.  Root stock can be purchased for a variety of purposes including cold hardiness, dwarfing and semi-dwarfing.

Saturday, February 9, 2013

Speckled Alder Firewood

One of the biggest disadvantages of heating and cooking with the same stove is that occasionally we want enough heat to cook with but the cabin is already warmer than we want. Other than having two separate stoves there is not much to do about that but the right type of wood can help. When we want to fry up that bacon and those eggs we need high heat but only for a little while. If we put in some  good dry oak or hickory we will get the heat but also a nice big bed of coals that will have us opening the doors and windows to get the temperature in the cabin back down out of the 90's. What we need is wood that burns hot, fast, and leaves few coals.  Speckled Alder, Alnus rugosas, fits the bill perfectly. A small tree that abounds in our area,it seldom reaches 30 feet tall and 3-4 inches in diameter. It likes wet areas and often grows in the sunny parts of swamps and marshes. It forms large stands in much of our area and sends up rapid growing shoots from the stump.I cut the pile in the picture in about 3 hours using the tools in the picture. Once it is cut up it will be 3/4 to a full face cord of the perfect cooking wood. It drys fast when cut in the winter and will be ready to use in a couple months if we need it. Since the swamps are froze up now it is a good time to harvest some. I take just the larges trunks from each clump leaving the smaller trunks for another year.

Wednesday, February 6, 2013

DIY Box Trap

We are over run with snow shoe hares here this year as well as a lot of cottontail rabbits. I have only seen a few coyote tracks and no other predators seem to be in the area to take advantage of this bumper crop of bunnies. Since both of these rodents will present a problem for my orchard and my wild berry patches I will have to take the predator job for a while. Both of my adversaries can out run me and hide better than me. My solution, in part, is using these box traps. Buying box traps is an expensive proposition so here's my DIY version.
Here is a sketch of how the trap works. The tin can you  see in the top picture contains what ever bait you want to use. It hangs from the top of the cage and is able to swing front to back. Looped around that is another wire[yellow] which holds the door open until your victim enters and wiggles the bait can. This allows the door,which is spring loaded to snap shut. The little kink in the top wire is to enable adjusting the length slightly if needed. You could just leave the end of the wire the door sets on straight.

I like this loop on the end because it slides easier to let the door snap shut. I use the coil springs from a rat trap for my door springs.  I use heavy cage wire since it makes the trap more versatile as far as what I can use it for. This trap will work fine for almost any small critters except raccoon, they would simply eat the bait and then lift up the door and leave, smart and strong! Mink,weasel or skunk could all be caught in it though as well as rabbit and squirrel. Local law would determine which, if any, of these you could trap.
 Here is a view looking in the door which might help a little. The door should overlap the opening on all sides and fit tight along all edges when shut. Make sure to smooth the edges of the door opening since you will be reaching in to put in bait and to set it. This trap is 91/2 inches high by 9 inches wide by 24 inches long. I bend as many joints as I can and fasten every thing together with either cage clips or small pig rings. If you don't have those you could just wire it together too.

Sunday, February 3, 2013

Maple Syrup Season...Soon!

Tapping season is just around the corner and all over the north woods people are starting to get their sugar bush in order. The big time operations are putting up lines taken down by windfalls and fixing all the spots squirrels chewed. Small hobby syrup makers like us are getting our gear in order too. We have built up our inventory of equipment over the years which has led to quite an assortment of taps. Here are four different ones, the plastic one being the newest type. These are designed for use with tubing such as the big producers use but they work fine for us too. I use to run a section of tubing into a bucket with a lid.
On a large tree that had several taps they could all go into one bucket through a small hole near the top of the bucket. That method also works well when there is a clump of maples with several taps. The closed bucket keeps the sap nice and clean.Unless you tap a lot of trees a hand auger with a sharp bit will do a fine job. We put in up to 300 taps with this auger and a hammer to tap them in. We used every type of plastic bucket we could get our hands on for years but last year we added sap bags to our collection. I had wanted to use them for years but the holders were to expensive for me.
Last year I made a bunch of holders from pvc pipe. You will find two post about that in the archives so I wouldn't go over all that again.One article is a how to for anyone interested. I like the fact that the bags keep the sap clean and are relatively cheap.. The biggest problem we have had is that the bark sometimes rubbed holes in the bags.This seemed to be related to poor quality bags but I don't know how to judge that until it is to late. At least I can afford to go in and buy more bags when they are needed. New buckets are expensive and in a area with lots of hobby syrup makers used buckets are
scarce. Here is our sap pan, an entirely home made affair.The pan is 3 foot by 7 foot by 6 inches deep and bent from a 4 by 8 piece of sheet metal. The fire box is a frame of steel tubing enclosed with pole barn steel siding. The fire box area is indicated clearly by the areas the paint is burned off of. The rear sloops up towards the top to keep the heat against the pan. The floor of this area is steel siding with a couple inches of sand on it. Hopefully this will be a better year than last. I have a few repairs to make on our sugar shack so I better get to work. Tapping season will be here soon.

Thursday, January 31, 2013

Wild Water

It has been a slow week here. The weather has been yucky to say the least, rain one day and below zero the next. We did get out for a little exploring earlier this week. Here in Wisconsin we have lots of county owned forest. We buy a permit most years that allows us to harvest dead, down trees for fire wood. Of course, so do a lot of other folks so we are always on the look out for some area others might not have checked lately. We had this area in mind for a while but have never got around to looking it over until this week.
While we did find a few trees that are close enough to the road to get them out, this free flowing wild spring was the high light of our day. We often drive 10-11 miles to a spring in the national forest here for drinking water. This spring is only a few miles away and less than 300 yards from the road. I plan on going back and getting a sample to have tested. Considering the fact that we are in drought conditions here, this spring had a good flow even during below zero temperatures.
 On a different note, the top pic is me holding a Eastern Leatherwood , Dirca palustris. As it's name indicates it is very flexible and leathery. It is a good shrub to learn to recognize is you do any wilderness camping or hiking. It can be used for cordage as is or it's bark used as cordage fresh or dry. Very handy if you need to build shelter in a emergency type situation.

Sunday, January 27, 2013

DIY Drum Carder

No, this is not a picture of a medieval torture device though it will hurt you if you are not careful! This is my home made fiber drum carder. I built this several years ago to try to speed up our processing of wool. At the time we had about 80 Shetland sheep so we had lots of fiber to process. A big hunk of the price of wool yarn is in the processing and I wanted to keep some of that money here on the farm. When I looked into the price of commercial processing equipment I realized there was no way to just do your own wool after spending that kind of money
 on commercial equipment. For a tightwad like me there was only one alternative, build my own! A drum carder is a fairly simple piece of equipment. The big drum on back collects the fiber, the front drum merely feeds it to the big drum. The trickiest part is the fact that the front drum turns counter clockwise [towards the front} and the big drum turns clockwise[ towards the back]. This is why the belt takes the serpentine route it does. If it simply went from one drum to the other they would both turn the same way.
The whole thing has to turn fairly slow also. Just at a guess I would say the big drum is turning at about 50 r.p.m.s. and the ratio between the big drum and the small drum is important too. The big drum should rotate somewhere close to five turns for every one of the small drums rotations. That is determined by the pulley sizes on the left end of the drums.In order to get the speed low enough I have two sets of pulleys to drop the motors speed down[ right side]. As you can see from the pics I was really not spending any money to build this thing. The bigger pulleys I needed are all made from wood fastened to a small metal pulley. This is a low speed, low power contraption so you can get away with them. Where I really went cheap-o was on the carding cloth, I didn't buy any. I made my own from used rubber belting and a big pile of little bitty nails. If you look closely you will see that each nail has a small bend or curve in it. The big drum's lean back and the little drums lean front. It works but it was time consuming to say the least. If I were to do it over I would buy carding cloth.
 This carder is great for making batts to felt or for quilting batts but they are not combed fine enough to spin from them. Ann runs the batts through her hand powered drum carder once more to get them combed good enough to spin from. Still, it does save some time and I pulled it out of storage to speed things up since we acquired this pile of llama fiber to process.
One other thing I should mention, the distance between the two drums is very critical so the front drum must have adjustable mounts. It needs to be able to slide front and back about a quarter of a inch. At set up, the teeth of the drums should just miss each other.

Tuesday, January 22, 2013

Spoon Carving 101

Yesterday the temperature was 12 degrees below zero[ F.] and windy, wind chill factor was anywhere from 30 to 45 degrees below zero. What's a homesteader to do? This one threw another log on the fire, put a old Santana tape on, and made a big pile of wood chips. I like white birch for my occasional bouts of spoon carving. When ever I take a white birch for fire wood I try to split out some pieces with nice straight grain for this purpose. Wooden spoons are a nice item to have on hand. Ann already has a good supply so this one will be set aside for a gift or as a barter item.I make all different sizes. This one is one the big side, 14 inches long, just right to serve up that big pot of stew cooking over a open fire.
 I have to put in a disclaimer here, I am not much of a wood carver so don't take any of this as gospel. I do my initial shaping with a machete type thing that is made to prune Christmas trees. It is light and very, very sharp.This pic shows a roughed out spoon, the piece at the left is how it looked when I started.
After I have the rough shape I want, the bowl has to be carved out. I do have a few carving chisels and use these round ones to make the bowl.  I then start smoothing every thing out as much as possible with a knife. I use a box knife for most of it since they are razor sharp and I can simply change the blade if it gets dull. They do make special curved knives for carving stuff like the bowl, but I don't have one. Once every bit is as smooth and even as I can get it, the work starts. I only use one grit of sandpaper,100 grit.
I don't like courser grits since they leave bigger scratches I have to get rid of later. If there is a very rough or high spot I use a rasp to feather it out. I try to keep every thing symmetrical and all the curves long and smooth. Once I have it all sanded smooth I go over it with very fine steel wool. The steel wool not only smooths it  out but will catch on any point that is not flat. I then resand that area and try it again. The last step is giving it a good soak in a pan of warm mineral oil. I let them set in that for several hours to overnight. It will soak in deep and protect the spoon from moisture for a long time.